Getting cards ready for printing
Card games, cards in board games. There is a fairly good chance that you have designed a card game at some point. For many, their first steps into designing games start with a card game. Easy to prototype, easy to carry around, endless possibilities. Now, there is a lot of information out there about the intricate details of designing a (card) game. In fact here are entire discussion groups dedicated to it. Lots of ways to let your creativity run wild and create something amazing. But there is one thing that a lot of those articles tend to leave out. The practical aspect of it: getting them transformed from an idea, from artwork, from a rough draft.. Into a file ready to be send off to the printer. Let’s get into the other side of board game manufacturing!
So even though it is not as thrilling and creatively satisfying, this article will discuss getting your cards ready for printing. Files that are not ready end up needing a lot of back and forth between the designer and the printer, which is a huge waste of time and effort for everyone involved. But more importantly, it could mean the difference between getting that Kickstarter fulfilled in time. Or getting your shipment of games in on time for the next big convention. You don’t want to be standing at Gencon at your booth with nothing to show and sell, do you? So whether this is your first time prepping card files for printing, or whether you designed the first 5 generations of Pokemon trading cards, let’s take a short moment and walk through the necessary steps to get everything perfect and ready for printing.
Bleed and margin

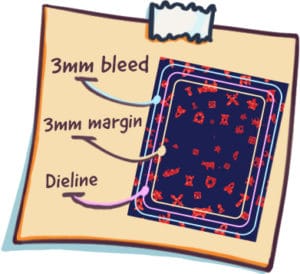
First up, bleed and margin. What is bleed and what is margin? Bleed and margin are there to make sure that after printing when the cards are being cut, there is enough printed that extends to the edge of the page. The thing is, there is a very minimal amount of movement that may occur when printing with a press. Thus, if your artwork is made to fit exactly and the press moves a millimeter, then the whole artwork moves 1 mm in a given direction. Then, when we start cutting, part of the card won’t have any artwork. Furthermore, there is also a small degree of movement that can occur when cutting the cards. So that means in both printing and cutting, we wanna make sure that even if a small amount of movement occurs, the artwork and the printing are coming out the right way.
So how to best do that? By keeping in mind these 2 ground rules:
- Keep all important artwork and texts from the cards within the margin line.
- Make sure that there is enough background artwork that extends all the way up to the bleed line (or even better, beyond the bleed line!).
Stick to these two principles when designing the cards and deciding the layout of the artwork, and everything will come out looking great.
File format
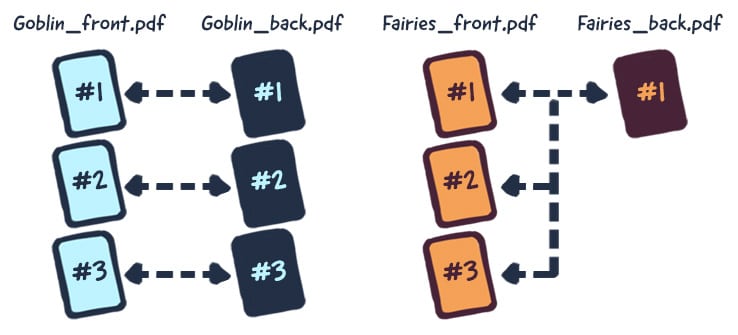
 Next up is the file format for the card files. There are a lot of types of software out there to design your cards, and it depends on what you are familiar and comfortable with which one you should be using. So to make sure that we are all on the same page, we ask that the cards are submitted as PDF files. It’s really easy, since all the cards can go into a pdf file, and each individual card becomes a page. So if you have a standard 54 card deck game, you’ll end up making a 54 page long PDF file.
Now, of course there are 2 sides to a card, so go ahead and make a second, 54 page long PDF file, but this time for backside. We will match the page numbers up, so page #25 in the first PDF file, will be matched with page #25 in the second PDF file. Now of course, don’t forget to name the PDF files accurately, so “Goblin Destroyer Deck FRONT” and “Goblin Destroyer Deck BACK” go together, and “Fairy Unicorns Deck FRONT” and “Fairy Unicorns Deck BACK” go together. Wouldn’t want to be mixing those two up.

Card decks are submitted as PDF’s, where 1 card = 1 page in the PDF file. Separate PDF files for the front of the cards and the back.
Offset Printing
So far it is pretty straightforward, but here is where it gets a bit more technical. After all, this is board game manufacturing, with a focus on the word manufacturing.
When we talk about printing cards, it might actually be a bit different from what you think. Unlike the printer you might use at home, we use a printing technique called offset printing. What offset printing does, in a nutshell, is it prints four colors separately from each other. These 4 colors are cyan, magenta, yellow and black. You’ve probably seen the term CMYK mentioned before? Bingo. Using just these 4 colors, by adjusting the percentage of each color even by the tiniest bit, you can create millions of different variations and hues.
Now, for black, there is a specific color formula that you should use, to make sure it comes out looking great. What you want is a deep, rich and consistent black, and even better if we can color match between different print runs! So for black, set the color mix to to the following formula:
C: 40% M:0% Y:0% K:100%
And you’ll get an amazing deep black, just the way it should be.
Final checklist:
- 3mm bleed
- 3+ mm margins
- CMYK color mode
- images at 300+ppi
- black text: pure black
Also check out our other artwork production guidelines here, where we take you through the production process of boxes, game boards, punchboards and more.


Sorry, the comment form is closed at this time.